Conventions
Cosplay Armor Building with Pepakura

Pepakura is the perfect way to build that cosplay armor or weapon you’ve always wanted without breaking the bank
Have you ever seen those incredible cosplay outfits as conventions? Suits of armor from Halo, Skyrim, World of Warcraft, and more? Ever wondered how it was done and how expensive it was? I’ve asked myself those same questions and recently discovered many of those amazing armor sets were done with a system called Pepakura.
What is Pepakura? It is a method of cutting out, folding, and gluing paper together to make armors of shapes and sizes, weapons too. Armor, weapons, even some of the paper toys you see at conventions are made with Pepakura. By taking a 3D image and breaking down its vector points in a special free program you can make your own Pepakura templates, or find already made ones online.
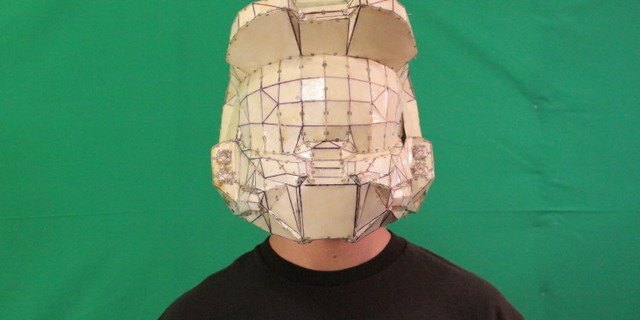
To help you on your way to make your own awesome cosplay armor I’ve created this guide to show you how I created my Halo Mjolnir MK V helmet. This guide will give you many of the quick and dirty details that many Pepakura masters scatter across multiple guides. It will guide through everything you need to get started and the basics of how to go from the designer to a finished fiberglass masterpiece. Starting with the program you’ll need and the best place to find files that will become your cosplay.
Programs and Files:
Pepakura Designer 3 – A free program you can find here, Pepakura Designer 3 is the basis your cosplay project. Using the program you can adjust the size and even the shape of the Pepakura files you find to create the perfect fit for you. It also gives you the power to design your own armor and weapon sets
Pepakura files – These are the 3D model files that you will put into the designer that ultimately become your cosplay. They allow you to look at individual sections of an armor or weapon to show you where they will be folded. You can find a massive collection of files here, it includes everything from Halo to Star Wars.
Materials:
Pepakura guides across the web will give you different ideas on materials you can use when building your cosplay but here are the basic things you’ll need.
110 Pound Card Stock – Make sure this is white or cream. The lines that you need to follow will be a gray color so they need high contrast. You can find this at most craft or office supply stores but be sure your printer is able to handle it. I will cover the best printer for Pepakura building later in the guide.
Glue gun sticks – You can get these pretty cheap and chop them up to put into your glue-pot from any craft or hobby store. They are easier to work with than glue chips and last longer when melted down.
Tooth Picks- You will need these to spread the glue on your folds. Other guides will suggest using small paint brushes but those become useless after the glue dries and have to be cleaned constantly. Toothpicks are also better for reaching the tinier folds.
Equipment:
Glue Pot – Easier and safer to use then a glue gun, you will want to make sure you grab a low temp glue-pot. Unless you don’t mind being burned constantly, then you can get whichever one you like. You can find these at any local hobby or craft shop.
Cutting Mat – Cutting mats are great for Pepakura projects because they keep the surface of your tables safe from the knifes you’ll be using. They are a low-cost way to keep your work area safe and stops it from looking like an Emo practicing ground.
X – Acto Knives – After printing out your cosplay you’ll realize it’s filled with hundreds of precision cuts that scissors simply can’t handle, no matter how fancy they are. Pepakura projects call for a set of X-Acto Knifes that come with several different sized blades for those microscopic cuts.
Gloves – Hot glue, fiberglass resin, bondo body filler when doing Pepakura your working with some nasty stuff so latex gloves are a must. They will help protect both you and your project from disaster.
Patience – This is a long process, you won’t be done overnight and it will be hard.
Paper, Printer, Knifes FTW
In order to have your armor fit well you will need to have measurements of yourself. You can go here to see the 405th tutorial for proper measurements for Halo gear. This is the measurement system I used and it is working very well for us so far. It will also work for any armor set but make sure you follow it closely or risk building a piece that won’t fit. Once you have your measurements we get to move on to the next step. Printing!
Now if your printer can’t handle the 110 lbs. card stock then I suggest you pick up either an Epson printer or a Canon. Canon is a little more expensive but the ink is cheaper where as Epson’s are cheaper with more expensive ink. Check for sales, these are your friend! After checking if your printer will work take the measurements you came up with and put them into your Pepakura Designer.
After printing everything you will need to bust out your knives, ruler, and cutting mat. Use your X-Acto‘s to cut out each piece, this is a long process but it’s worth it. Cut only on the solid lines, the dotted and the dot-dash lines are for the folding stage. Once you have everything cut out you are ready to move on to the more time-consuming process, folding, so be ready for that.
You will need a thin metal ruler, two different colors of pen, and patience, lots of patience. Pick a color for each line type. I used black for the dotted lines (also known as mountain lines) and blue for dash-dot-dash lines (otherwise known as valley folds). You want to use your ruler and mark each line using its colored pen, making it easier to know which way to fold. When your ready to fold keep in mind that Mountain lines. Once the lines are marked you will want to go through and fold each one, this is easiest to make a crisp fold by doing it over the metal ruler.
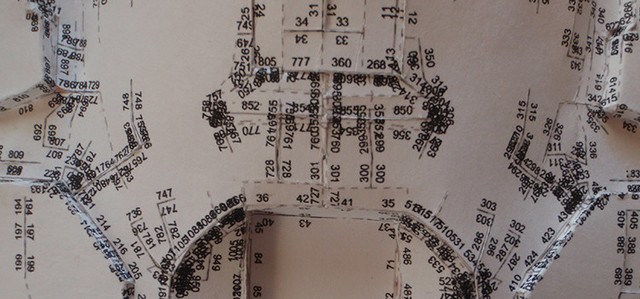
Once all of your pieces are folded you can move onto gluing. This is a lot like a puzzle because the folded pieces alone do not look like a helmet or much of anything really. Pull up your Pepakura Designer and choose a piece to start with, I started by building the visor and face first and it worked out perfectly for me. Just choose a starting piece and keep getting more pieces out that connect to it by clicking the connecting pieces in the program then finding them in your folded pile. You’ll see numbers along the folds, their will be two of each, you will be connecting those two numbers together and gluing them along the fold.
As for the gluing you will need your glue-pot, glue sticks, and toothpicks. Use the toothpicks to put the glue on the fold and press it to it’s corresponding number. Use a low temperature glue and pot otherwise you will burn yourself and it will be a mess. This way you can be much more accurate and nimble.
Resin, Fiberglass, and Primer oh my!
Now for the fun and dangerous part of the Pepakura process! I will list out the materials you need for the next few steps here:
Materials:
Respirator
Fiberglass Resin
Fiberglass cloth
Acetone
Cheap paint brushes
Black primer paint
Gloves
Safety glasses
Take your finished and dried glued helmet from part two and find a nicely ventilated area; an open garage or outside works best. Place it on a surface that you won’t be upset if it gets damaged while your working. Then put on your safety glasses gloves and maybe some clothing you’re not too fond of. Once your ready take between 1 and 3 ounces of resin, add hardener per container instructions, a paint brush, and a way to stir the resin. Once your resin is mixed up you will have 10 – 12 minutes at best to get the most out of the resin before it is too hard to work with.
With a brush paint a thin layer onto your piece until it’s covered. You will do this 3 times total, letting the resin dry for 2 hours in between. Once the outside is suitably dry and is no longer tacky to the touch you can move on to the next step. As soon as your resin is becoming too chunky to work with throw your brush into a cup of acetone, otherwise it will be toast. Don’t use expensive brushes for this!
The next step is the inside of the helmet. You have to put down fiberglass cloth on the inside of the helmet. By cutting your cloth into 3 inch wide strips it will be easier to place them the helmet. The trick to this is to put down a layer of resin onto the place where you will put that piece of cloth then use your brush to blot resin onto the cloth until it is all lying down and covered. This may take you a couple of tries before you get all the pieces down but that’s alright, it’s a slow process. Let the helmet dry overnight.
After the helmet has dried you can move on to the priming stage. This is very important. Put the helmet on its back and grab your safety gear once again. Prime the entire inside of the helmet with just one coat of primer. Let this sit and dry for about 4 hours. You can also get the bottom of the helmet in this stage. Once the inside and bottom coat have dried flip your helmet over. Now you can do the top; give the top of the helmet a nice coating and yes let it sit once again until it is dry.
Next up we will be going over sanding, priming again, and then the painting of your piece. It may seem a tad convoluted but each step is important to the integrity and strength of your piece. Nothing is worse than a flimsy paper craft armor set that breaks when you wear it!
Sanding, Prime, Paint, and that’s a Wrap!
Congratulations your officially through the roughest parts of the process! Your piece has been folded, glued, fiberglassed, and primed. It probably doesn’t look like much right now, in fact it probably has a lot of rough edges that your wishing were gone. Those rough spots are exactly what the next step will fix.
For this you will need something that is able to sand down those rough edges. You can use med-fine grit sand paper, a power sander, sanding sponges, or a dremel. No matter what you use go across the piece your working on sanding down the rough edges left by the fiberglass process. Keep going until you have nice clean edges, no lumps, and nothing sharp sticking out.
After that’s done you’ll be left with a lot of spots where the primer was sanded off and the bare helmet exposed again. That is when we will be finally using the bondo body filler that we mentioned earlier to create sharp lines and smooth edges. You will be spreading the bondo to all the little nooks and crannies of the piece that were sanded down or spots that you want more definition in. The body filler is the perfect way to make those fine lines pop.

Fill in the areas with bondo that you want to improve on, quickly before it hardens making sure to smooth it all down before then to avoid a lot of unwanted lumps. After that let it sit for several hours so it can harden. Then go back at it with your sandpaper one last time to eliminate any little problem areas the bondo might have made. Once that’s finished you can simply attack your piece with the black auto primer paint again to get it ready for its final paint job.
After letting the primer dry your all set to decide on the colors you want for your piece and how your going to do it, although spray paint is your best bet. Any other finishing touches will depend on the armor piece your making, like adding any lights or breathers. For in-depth tutorials like that you can find all of your answers at the 405th.com. Otherwise good luck and I hope to see your cosplay at a con soon!
In exactly two weeks, an epic journey will start in the heart of Transylvania for all those who love comics, games, and movies. The Transylvania Comic Con starts on October 18 and invites all participants to enjoy a three-day event where they will get to unleash their imagination at the cosplay contest, meet their favorite actors at the photo ops and photographs sessions, or find out interesting things at the panels hosted by the event. Great fun is granted even for those who would just like to take a look at the ComicCon and do some shopping of really cool items or snap some pictures with famous props, such as the Iron Throne.
The Transylvania Comic Con will take place in the heart of Transylvania, at the BT Arena in Cluj-Napoca. The event starts on Friday, October 18 at 4 P.M and lasts until Sunday, October 20. The stage hosts’ roles will be filled by Maria Muller and Ken Huegel. Some of the celebrities invited to the event are ‘Vikings’ and ‘Hunger Games’ star Alexander Ludwig, Kevin McNally Pirate of the Caribbean, ‘Spartacus’, ‘Arrow’, and ‘Shanarra’ star Manu Bennet, Rick Cosnett, from ‘The Vampire Diaries’, ‘Stargate Atlantis’ star David Nykl, and Roger Ashton- Griffiths, who played Mace Tyrell in Game of Thrones. Cosplay enthusiasts will get to see Daisy Cosplay and Imriel Cosplay.
Transylvania Comic Con will also welcome three featured artists and a Cosplay Guest, who wasn’t announced yet. The schedule is not public yet, and the timetable is subject to change, however, on October 5 participants will get the first glimpse at the program, from where they will find out more about the guests of the event. What we already know is that Transylvania Comic Con will host cosplay competitions on Saturday and Sunday. The General Cosplay Competition hosted on Saturday targets solo cosplay enthusiasts only, while on Sunday groups will get the chance to show off their costumes. This is also the day of the qualifiers for the international cosplay competition Clara Cow Cosplay Cup.
Tickets for the Transylvania Comic Con are still available for purchase, except for the VIP 3 Days Tickets, which are all sold out. The rules for participants and the tickets can all be found on the event’s homepage, here. It will definitely be an epic event, so we hope to see you there!
The countdown has begun. There are less than three weeks until Transylvania ComicCon kicks off. The three-day event will take place in the heart of Transylvania, in Cluj-Napoca, Romania, between 18 October and 20 October at the BT Arena. Those who will attend the event will get to meet some really cool guests and can participate in numerous activities, all of which are going to be amazingly fun. The schedule of the event won’t be available for another couple of days, however, the majority of guests are known.
Transylvania ComicCon will welcome some beloved actors, such as Alexander Ludwig, Kevin McNally, Manu Bennett, Rick Cosnett, David Nykl, and Roger Ashton- Griffiths. The event will be hosted by Maria Muller and Ken Huegel, and the YouTubers/ streamers of the Transylvania ComicCon will be Cluj-Napoca’s own Creative Monkeyz. It is not yet clear who the featured artists will be, but this should become known on October 5th, when the event’s schedule will become available on the website.
Besides having photo ops and autograph sessions with the aforementioned guests, participants will also be able to show off their imagination and skills at the cosplay contests. The solo General Cosplay Competition starts on October 19 from 13:00. The group competition starts on Sunday, also at 13:00. At the same time, the qualifiers for the international cosplay competition Clara Cow Cosplay Cup will start. Other activities participants can attend at the Transylvania ComicCon include panels, and props& booths. Naturally, there will be an artists’ alley, a gaming area, and a shopping area too.
The entry fee for the Transylvania ComicCon is really affordable. Those who want to have a photo op and get the autograph of Kevin McNally or Roger Ashton-Griffiths have to pay less than 15 Euros for the treat. The VIP three-day tickets cost less than 100 Euros, while one-day entry fees are as low as 10 Euros. These prices may be incredibly low but the level of fun will go incredibly high at the Transylvania ComicCon. Check out the event and all it has to offer here.
Let’s travel back to 2000s. Can you remember the time when MMORPG genre popped up out of nowhere? Early genre games such as Everquest, World of Warcraft or Guild Wars were considered to be the prophets of the new age of PC gaming. MMORPGs or Massively Multiplayer Role-Playing Games have been considered the most gratifying, rewarding, immersive, and time-soaking games out there. However, as time went by, only a handful of MMORPGs managed to secure their communities and stay a little while longer.
So today we’re talking some time (and internet space), introducing the very best games of the MMORPG genre. Some of these games are old and can brag about their long history while some of them are fairly fresh inviting fans of the genre to explore seemingly unending content. Most importantly – all of these games are alive and will grant you hundreds of hours of joy.
- The Elder Scrolls Online
We begin our list with the youngest of the bunch. ZeniMax Online Studios creation, The Elder Scrolls Online is set in the magical continent of Tamriel which will be familiar to the fans of TES franchise. The game’s storyline is indirectly related to other games of the franchise; however, the game is set way far back before the events of Oblivion, or Skyrim. Currently the game has two expansions: The Morrowind and the Summerset, however, the developers have promised a third expansion The Elder Scrolls Online: Elsweyr which is coming out on June 4, 2019.
- Final Fantasy XIV
Final Fantasy XIV is developed and published by Square Enix. First released back in 2013 the game quickly became a hit among many MMORPG genre fans across PC and PlayStation communities. It has tons of great content which is keep on coming even to this day. Recently Square Enix has announced yet another game expansion titled Shadowbringers which will bring a variety of new dungeons and include yet another playable race: the rabbit-like Viera, already known to the fans of Final Fantasy XII. The game will also increase its level cap from 70 to 80 and introduce a number of new zones to explore.
- Guild Wars 2
This ArenaNet MMORPG game certainly deserves a spotlight in our list. Guild Wars 2 is an attractive piece because of its ever-living world structure which captivates players with multiple quests, continuing storyline, and rewarding gameplay mechanics. The game is also considered among the best MMORPGs because of its freedom and versatility when it comes to personalization. You can literally create, augment, and specialize your character in such a way that it would be exceptionally unique to your preferred playstyle.
- RuneScape
RuneScape is the oldest game on our list, however, it carries the very same explorer’s spirit within. It’s safe to assume that if you’re interested in MMORPG genre you’ve tried this game already at a certain point in time. We can still remember the wood chopping, fire making, and fishing activities which required hours upon hours of discipline, and we also remember how much joy did that provide. And it still does if you’re patient enough. That’s why it secured a spot on our list!
- World of Warcraft
No MMORPG games list would be complete without the king of the genre. It has been over 14 years since Blizzard released World of Warcraft. The game was a phenomenal success and became one of the most iconic titles of all time. World of Warcraft is even included in the video game Hall of Fame and there are plenty of reasons why. Even today the game is huge and has millions of players logging in to play it every month. Throughout its history World of Warcraft has seen 7 major game expansions with tons of great content to explore. Furthermore, Blizzard is planning to release a Classic version of the game sometime this summer which means that the king of MMORPGs can be entering its second lifecycle. If you’ve never played – we do recommend you give it a try.
While some of these games can be played for free, some will require you to purchase certain expansions (or game time). On Eneba Marketplace you’ll find everything you need in order to start your new MMORPG adventure!
- Gadgets10 years ago
Why the Nexus 7 is still a good tablet in 2015
- Mobile Devices10 years ago
Samsung Galaxy Note 4 vs Galaxy Note 5: is there room for improvement?
- Editorials10 years ago
Samsung Galaxy Note 4 – How bad updates prevent people from enjoying their phones
- Mobile Devices10 years ago
Nexus 5 2015 and Android M born to be together
- Gaming10 years ago
New Teaser For Five Nights At Freddy’s 4
- Mobile Devices10 years ago
Google not releasing Android M to Nexus 7
- Gadgets10 years ago
Moto G Android 5.0.2 Lollipop still has a memory leak bug
- Mobile Devices10 years ago
Nexus 7 2015: Huawei and Google changing the game